Archive for the ‘Roli Blog’ Category

Grou.ps

October 31st, 2010 by Roland Straub

I’ve been thinking lately a lot about how to motivate students to work with enthusiasm not only inside the classroom but also at home when they don’t have anything better to do than watching TV or being on Facebook.
Teenagers spend quite a lot of time in front of their computer nowadays and if they are active on a social network then most probably on facebook. Social networking is just another way for them to interact with their friends and family. However, I think a teacher can use this to make a learning tool out of it.

Ning is a very famous and popular social network where you can create a private social network and administer everything on it. However, Ning is not free anymore so I had to find an alternative to it. Moodle is great but it just gives me a strange feeling…it just has such a bureaucratic look to it…anyway, this is just my personal opinion. Nevertheless, I think I found an appropriate alternative for Ning at which is Grou.ps.

On Grou.ps you can create your private social network, strictly for your class but also for anyone whom you invite.

To find grou.ps just type in the name in Google and the first page that pops up is what you need. This is what you’re supposed to see when you first open the page:

In order to start your own social network, you have to give it a name:) If you get a green tick on the right side of the name then you may continue….if it’s a red X then you have to try a different name. When you’re ready typing in the name, just click on create social network and 6 steps will appear on your screen for creating the network:

In the first step you just have to give it a name and a title. And make sure you tick Private if you want it for your class only. If it’s private, it means that only people whom you invite may enter the network.

Step 2:

Just choose a template which you like best. You can click on their names to see how your network would look like.

Step 3:

Step 3 is more for people who want to make their network as personal as possible. Here you can customize your the look of your network from fonts to colour…anything. Of course you can always choose to leave it as it is and make absolutely no changes in this step.

Step 4:
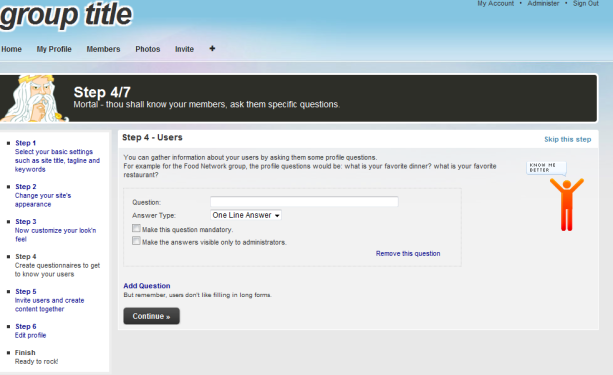
At this step you can get to know your students a bit better right from the moment when they join the network. You can type in a question for anyone who joins the network. You can choose to make the questions mandatory therefore each of your students will have to answer the question:) You can add more than one question….you can actually add as many questions you want.

You can also use this as a questionnaire at the beginning of a course if you want to because you can choose the types of the answers the students can give. Your options for the answers are:

  • one line answer
  • longer answer
  • multiple choice
  • date
  • or even a website address

Step 6:

The sixth step is for your profile information. You can enter your name, birthday, nationality, gender and a picture if you want to.

When you’re finished just click on the ‘Finish’ button under the picture.

Now the real fun can begin:)

When you’re network is finished you should see this:

In order to start working with your network properly, you should add some modules to it. Modules are the places where you can upload videos, music, files, wikis and more. To do this you have to add them by clicking on the ‘Plus’ sign next to the ‘Invite’ button:

When you do this you will get 3 options of what to add:

The option that is important for you is ‘Modules‘. If you click ‘Modules‘ you can choose from a list of modules to integrate into your network.  You don’t have to add anything if you don’t want to and you can choose which one to add. I personally think that you should have a module for files, videos, wikis, music, links and maybe events and blogs. These are the ones that I added to my network.

After adding these modules your network should look like this:

When you’re done with adding modules you can start using your network as a virtual classroom.

Inside the classroom:

  • you can ask your students to upload a video, picture or music for their presentation in the class. They can then talk about the video/picture/song in the class…why they’ve chosen it and what importance it has for their presentation.
  • if each students has a laptop, you can ask them to work on a project together using a wiki.
  • they could also practice some language skills for comparing and contrasting. You can upload a video/picture/song and ask your students to comment them by using appropriate language for comparing and contrasting.
  • you can ask them to upload their favourite songs onto the music section and play it in class while their working on a project or other similar task which don’t require absolute silence in the classroom.
  • IMPORTANT: If you want the students to upload something, you have to make them admins. However, you can always make them only members again and take away their admin rights. In order to make them admins, just go to the ‘Members’ section by clicking on ‘Members’ in the top right corner of your screen:
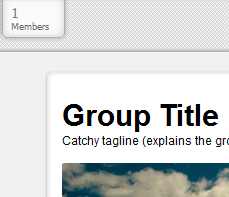
In the members section just change the members rank to administrator. When the students are finished uploading stuff you can always change their status back to members only….or you could leave them admins.

How to change member to admin and vice versa:
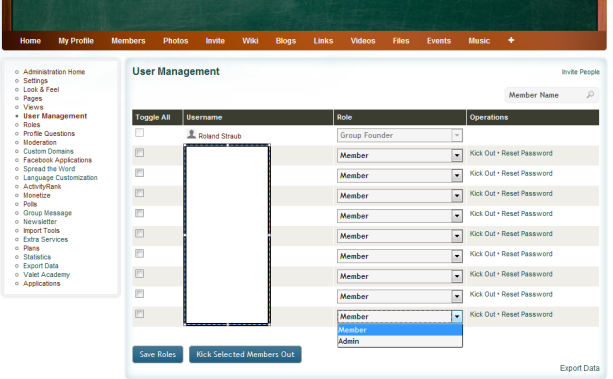
Make sure you save the changes by clicking on ‘Save Roles’. If you want someone out of your virtual class, just select a member and click ‘Kcik Selected Members Out’ and he/she is out:)

Outside the classroom:

  • A private social network has of course more advantages for home use. You can ask your students to discuss and plan an event by using the wiki module on the network. This allows them to work on it asynchronously. If some of them have other more important things to do on the day other students are working on the plan of an event, they can edit the plan the next day or hours later until the deadline for the event.
  • you can ask them to send any written homework on your private network by uploading them in the file module. This way you have their homework stashed online. You can always give them feedback on their homework on the network and you get to keep each piece of their homework without having to keep an actual printed version of them stashed up all around your desk in your home or at your workplace.
  • you can upload a video/picture/song and start a discussion or a debate on them as a lead in to the topic of your next lesson. Students will feel more safe talking and learning about a certain topic after having already shared some thoughts on it.
  • you don’t have to create an email group anymore. You can send any messages or reminders on the newsfeed which is the start page of your network.
  • you can ask them to start a class blog by writing about what they’ve learned every week in your lessons.
  • you can ask them to share any interesting links they might have used and feel they’re interesting for the class. You could ask them to write a short review of each website they upload so the person who sees it can decide whether it’s important for him/her or not. You can then grade or rank the reviews in class.
  • you can add a subgroup module to your network and create a groups inside your virtual classroom. You can then give different tasks to different groups when working on a project. This way not everyone in class can see what the others are doing…this is the difference between posting something in your group or posting something on the newsfeed. When finished, the ca add their work in a wiki and compare what they’ve done

Personally, I think this tool can be a very nice alternative to other social networks and if you don’t want them to be a total outsider from facebook, grou.ps still allows you to add facebook applications (but if you want more information about this then let me know…post a comment).

It’s ad free so it’s great for educational purposes. You can edit almost anything in it thus you can make it as visually attractive as possible:)

Of course, you need to put some time into it at the beginning and administer is maybe weekly by uploading tasks and assignments otherwise your students will get bored of it.

PlayPlay

Windows Movie Maker for teaching

October 26th, 2010 by Roland Straub

Windows Movie Maker is a free software if you have already purchased your windows operational system. You can use it to create and edit videos, pictures. It creates a kind of slide show as in a power point presentation although the difference is that you can publish your work on WMM directly on YouTube or process it in any other format. Of course there are more differences between WMM and PPT such as video editing options, visual effects and animations, some you might not have in PPT and it’s always visually more attractive to create a movie and not a PPTJ You can find in on your computer just by clicking the start menu button in the left corner of your windows screen and then type in movie maker. Finally, click on the Windows Movie Maker option under Programs. WMM will start and it will look like this:

WMM is a great tool for beginners and also for those with advanced tech knowledge. It’s simple to use.

How to begin

As you can see your options are on the top of the screen. The best way to begin is by adding  pictures or video (pre-recorded or video from any free sites – just make sure that the videos, pictures or music you’re using in your movies do not have a copyright) to your project.

You just have to click the Add videos and photos button and then make your choices. When you add photos or videos your WMM will look like this:

On the right you have a larger version of the first picture or video from the left side. The right side is where you can view what you’re editing. You edit anything you have to by working on the left side, where the pictures or videos are imported and you also have to use the tools that are on the top of the screen.

How to use the timeline

The timeline is the black vertical line that appears at the beginning of your video.

You can drag that line wherever you want to in your movie. As you can see in the sample the timeline is now at the end of the first picture. This is very useful in order to introduce music or text only where YOU want to.

Adding music

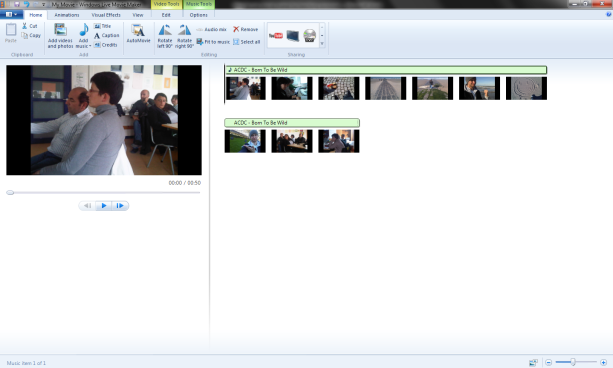
If you want to add music to it then you just have to push the Add music button and pick your choice. After adding some music your slide should look something like this:

You should observe that a green line, with the name of the song and artist, appeared on the right side of the screen just above your pictures or videos. You can try to push the play button on the left side of the screen under the larger image to see how it looks like.

Editing music

If you don’t want the music to start from the first picture and you’d rather it started from the second then click on the green line (for music) and drag it while holding the left mouse button on the green horizontal line and drag it to the beginning of the second picture. It will look like this:

You can play the movie to see if you like it like this or not. If not then just drag it back to the beginningJ

Also, if you want to just change the starting point and ending point of your song, you have to click on the Music Tools button on the top of the screen. You will see some new options appear on your screen which are important for editing the song you are using in your movie. The Music Tools looks like this:

As you can see you don’t have that many options but at least you can fade in and fade out the song and add the start and end point of your music. You can choose from 3 types of fading speeds which are Slow, Medium and Fast. As for the duration of the song just type in at what time you want your music to start and at what time you want it to stop.

Now you might have noticed that you have Start time, Start point and End point.

Start time means at what time in the movie you want it to start (for example: right from the beginning of the movie or just from the second picture).

Start point is a nice tool which allows you to start the song at any moment you’d like. With this tool you can cut out the first part of the music and begin directly with the 40th second or jump start anywhere you want.

End point is the time when you want the song to end in the movie.

Music Tools with changes:

As you can see I change the Fade in and Fade out speed and also the Start time, start point and end point. As a result you can see the changes on the left side of your screen.

Adding text

By now you have some pictures and music in your movie(you don’t have to add music if you don’t want to and not even text…it’s always up to you). Some of you might want to add also some text in the movie. In order to do this you have to push the Caption button which is between Title and Credits next to the Add music button.

After you’ve pushed the Caption button a caption for adding text will appear on the left screen, this time under the pictures or videos. This way it’s visually easy to distinguish the music and text timeline.

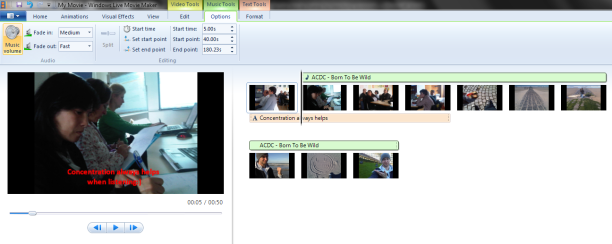
If you followed the instructions then you should be able to see something similar to this on your screen:

Text editing

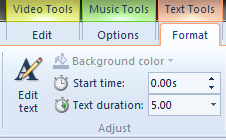
It’s as easy as it says under the picture in the text timeline…you just double click the text timeline and type in anything you wantJ However, if you want to make your text last longer or just change the duration of the text you have to start editing it already, but this is easy also. Just double click the text timeline or click on the Text Tools which is on the top of the screen next to Video Tools and Music Tools. This is the first and most important step towards editing your movie. When you click this section you will see that some new options will appear which are very similar to the Word Document editing options. What you have to do here is simply to click on Text duration and insert the length of the time you’d like your text to last.

When done it should look like this:

Of course you can always change the size, format, transparency, alignment and colour of your text simply by clicking on the icons above the picture on the right side of your screen. You can always re-edit your text by clicking on the Edit Text button on the top of the screen in the Text tools section.

Video editing

Editing your video is very similar to editing your music. It has the same options as the Music Tools section. One extra option is the trimming option. If you have a video that you would like to have in your movie but don’t want the entire video because it’s too long or because you just want to use a part of it then you can trim it (cut it up into pieces). Trimming is quite easy in WMM. You have to click the video on the right side of your screen first and then click the Trim tool option in the Video Tools section on the top of the screen.

On the left side of your screen the trimming tool for the video will appear. You can either go to the top of the screen and add the Start point and End point for the trimmed section of your video…

OR

You can drag the Start point and End point on the video where you want to.

In the classroom

–          You could ask your students to make a movie instead of a power point presentation whenever they have to work on a project

  • They could record short or long videos for their project using only their phones or if you have a video camera….well, even betterJ and add these to their movie so it becomes more personal
  • You could ask them to take pictures for their project themselves (so there is no copyright issue anymore)

–          You could ask them to make a movie based on a story. You’d have to ask them to think of the plot of the story together and then devide them into groups (or they could work individually also if you’d like) and ask each group to write one part of the story. Consequently, one group could create the beginning of the movie, the second group could work on the main body and the third group could think of the ending. All this with or without letting the group interact.  They could then come together as a class and put their movie together as one. This can be challenging for them and teenagers or even adults always enjoy a challengeJ they can always publish their work on YouTube if they want to.

Outside the classroom

–          You could ask them to keep a vlog (video blog) for a week or a month about what they have been learning for that period of time or their impressions on each lesson or each week and then edit and produce a movie about it.

–          You could ask them to keep a video diary for a month or so, filming themselves maybe 3 times a week about what they learned. This way they could practice their past tensesJ if you want them to practice grammar. Nonetheless, you could ask them practice any type of grammatical issue through this and they could have some fun with it too in the meantime

–          Whenever you ask them to read a book, you could tell them to choose a picture from Flickr or Google and associate it to each of the chapters in the book and tell the story through a short movie. They could have a slide of each picture and a recording of them talking about why they have chosen that picture for that chapter. This is helpful for letting them tinker about their own perception of the book and how they visualize it.

PlayPlay
  • Search Pontydysgu.org

    Social Media


    News Bites

    Cyborg patented?

    Forbes reports that Microsoft has obtained a patent for a “conversational chatbot of a specific person” created from images, recordings, participation in social networks, emails, letters, etc., coupled with the possible generation of a 2D or 3D model of the person.


    Racial bias in algorithms

    From the UK Open Data Institute’s Week in Data newsletter

    This week, Twitter apologised for racial bias within its image-cropping algorithm. The feature is designed to automatically crop images to highlight focal points – including faces. But, Twitter users discovered that, in practice, white faces were focused on, and black faces were cropped out. And, Twitter isn’t the only platform struggling with its algorithm – YouTube has also announced plans to bring back higher levels of human moderation for removing content, after its AI-centred approach resulted in over-censorship, with videos being removed at far higher rates than with human moderators.


    Gap between rich and poor university students widest for 12 years

    Via The Canary.

    The gap between poor students and their more affluent peers attending university has widened to its largest point for 12 years, according to data published by the Department for Education (DfE).

    Better-off pupils are significantly more likely to go to university than their more disadvantaged peers. And the gap between the two groups – 18.8 percentage points – is the widest it’s been since 2006/07.

    The latest statistics show that 26.3% of pupils eligible for FSMs went on to university in 2018/19, compared with 45.1% of those who did not receive free meals. Only 12.7% of white British males who were eligible for FSMs went to university by the age of 19. The progression rate has fallen slightly for the first time since 2011/12, according to the DfE analysis.


    Quality Training

    From Raconteur. A recent report by global learning consultancy Kineo examined the learning intentions of 8,000 employees across 13 different industries. It found a huge gap between the quality of training offered and the needs of employees. Of those surveyed, 85 per cent said they , with only 16 per cent of employees finding the learning programmes offered by their employers effective.


    Other Pontydysgu Spaces

    • Pontydysgu on the Web

      pbwiki
      Our Wikispace for teaching and learning
      Sounds of the Bazaar Radio LIVE
      Join our Sounds of the Bazaar Facebook goup. Just click on the logo above.

      We will be at Online Educa Berlin 2015. See the info above. The stream URL to play in your application is Stream URL or go to our new stream webpage here SoB Stream Page.

  • Twitter

  • Recent Posts

  • Archives

  • Meta

  • Categories